这是第一篇真正的OpenCL教程。这篇文章不会从GPU结构的技术概念和性能指标入手。我们将会从OpenCL的基础API开始,使用一个小的kernel作为例子来讲解基本的计算管理。
首先我们需要明白的是,OpenCL程序是分成两部分的:一部分是在设备上执行的(对于我们,是GPU),另一部分是在主机上运行的(对于我们,是CPU)。在设备上执行的程序或许是你比较关注的。它是OpenCL产生神奇力量的地方。为了能在设备上执行代码,程序员需要写一个特殊的函数(kernel函数)。这个函数需要使用OpenCL语言编写。OpenCL语言采用了C语言的一部分加上一些约束、关键字和数据类型。在主机上运行的程序提供了API,所以i可以管理你在设备上运行的程序。主机程序可以用C或者C++编写,它控制OpenCL的环境(上下文,指令队列…)。
设备(Device)
我们来简单的说一下设备。设备,像上文介绍的一样,OpenCL编程最给力的地方。
我们必须了解一些基本概念:
Kernel:你可以把它想像成一个可以在设备上执行的函数。当然也会有其他可以在设备上执行的函数,但是他们之间是有一些区别的。Kernel是设备程序执行的入口点。换言之,Kernel是唯一可以从主机上调用执行的函数。
现在的问题是:我们如何来编写一个Kernel?在Kernel中如何表达并行性?它的执行模型是怎样的?解决这些问题,我们需要引入下面的概念:
SIMT:单指令多线程(SINGLE INSTRUCTION MULTI THREAD)的简写。就像这名字一样,相同的代码在不同线程中并行执行,每个线程使用不同的数据来执行同一段代码。
Work-item(工作项):Work-item与CUDA Threads是一样的,是最小的执行单元。每次一个Kernel开始执行,很多(程序员定义数量)的Work-item就开始运行,每个都执行同样的代码。每个work-item有一个ID,这个ID在kernel中是可以访问的,每个运行在work-item上的kernel通过这个ID来找出work-item需要处理的数据。
Work-group(工作组):work-group的存在是为了允许work-item之间的通信和协作。它反映出work-item的组织形式(work-group是以N维网格形式组织的,N=1,2或3)。
Work-group等价于CUDA thread blocks。像work-items一样,work-groups也有一个kernel可以读取的唯一的ID。
ND-Range:ND-Range是下一个组织级别,定义了work-group的组织形式(ND-Rang以N维网格形式组织的,N=1,2或3);
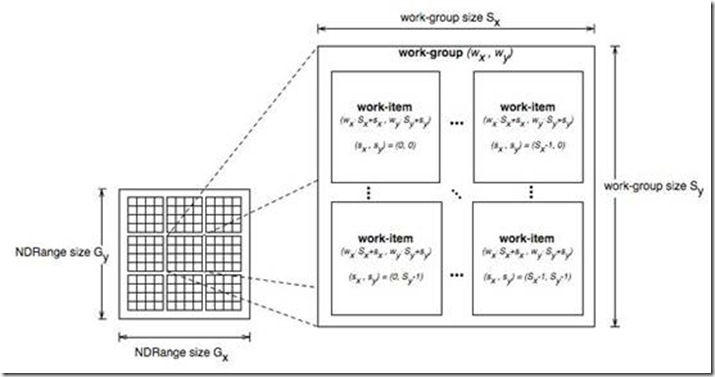
这是ND-Range组织形式的例子
Kernel
现在该写我们的第一个kernel了。我们写一个小的kernel将两个向量相加。这个kernel需要四个参数:两个要相加的向量,一个存储结果的向量,和向量个数。如果你写一个程序在cpu上解决这个问题,将会是下面这个样子:
void vector_add_cpu (const float* src_a,
const float* src_b,
float* res,
const int num)
{
for (int i = 0; i < num; i++)
res[i] = src_a[i] + src_b[i];
}
在GPU上,逻辑就会有一些不同。我们使每个线程计算一个元素的方法来代替cpu程序中的循环计算。每个线程的index与要计算的向量的index相同。我们来看一下代码实现:
__kernel void vector_add_gpu (__global const float* src_a,
__global const float* src_b,
__global float* res,
const int num)
{
/* get_global_id(0) 返回正在执行的这个线程的ID。
许多线程会在同一时间开始执行同一个kernel,
每个线程都会收到一个不同的ID,所以必然会执行一个不同的计算。*/
const int idx = get_global_id(0);
/* 每个work-item都会检查自己的id是否在向量数组的区间内。
如果在,work-item就会执行相应的计算。*/
if (idx < num)
res[idx] = src_a[idx] + src_b[idx];
}
有一些需要注意的地方:
1. Kernel关键字定义了一个函数是kernel函数。Kernel函数必须返回void。
2. Global关键字位于参数前面。它定义了参数内存的存放位置。
另外,所有kernel都必须写在“.cl”文件中,“.cl”文件必须只包含OpenCL代码。
主机(Host)
我们的kernel已经写好了,现在我们来写host程序。
建立基本OpenCL运行环境
有一些东西我们必须要弄清楚:
Plantform(平台):主机加上OpenCL框架管理下的若干设备构成了这个平台,通过这个平台,应用程序可以与设备共享资源并在设备上执行kernel。平台通过cl_plantform来展现,可以使用下面的代码来初始化平台:
// Returns the error code
cl_int oclGetPlatformID (cl_platform_id *platforms) // Pointer to the platform object
Device(设备):通过cl_device来表现,使用下面的代码:
// Returns the error code
cl_int clGetDeviceIDs (cl_platform_id platform,
cl_device_type device_type, // Bitfield identifying the type. For the GPU we use CL_DEVICE_TYPE_GPU
cl_uint num_entries, // Number of devices, typically 1
cl_device_id *devices, // Pointer to the device object
cl_uint *num_devices) // Puts here the number of devices matching the device_type
Context(上下文):定义了整个OpenCL化境,包括OpenCL kernel、设备、内存管理、命令队列等。上下文使用cl_context来表现。使用以下代码初始化:
// Returs the context
cl_context clCreateContext (const cl_context_properties *properties, // Bitwise with the properties (see specification)
cl_uint num_devices, // Number of devices
const cl_device_id *devices, // Pointer to the devices object
void (*pfn_notify)(const char *errinfo, const void *private_info, size_t cb, void *user_data), // (don't worry about this)
void *user_data, // (don't worry about this)
cl_int *errcode_ret) // error code result
Command-Queue(指令队列):就像它的名字一样,他是一个存储需要在设备上执行的OpenCL指令的队列。“指令队列建立在一个上下文中的指定设备上。多个指令队列允许应用程序在不需要同步的情况下执行多条无关联的指令。”
cl_command_queue clCreateCommandQueue (cl_context context,
cl_device_id device,
cl_command_queue_properties properties, // Bitwise with the properties
cl_int *errcode_ret) // error code result
下面的例子展示了这些元素的使用方法:
cl_int error = 0; // Used to handle error codes
cl_platform_id platform;
cl_context context;
cl_command_queue queue;
cl_device_id device;
// Platform
error = oclGetPlatformID(&platform);
if (error != CL_SUCCESS) {
cout << "Error getting platform id: " << errorMessage(error) << endl;
exit(error);
}
// Device
error = clGetDeviceIDs(platform, CL_DEVICE_TYPE_GPU, 1, &device, NULL);
if (err != CL_SUCCESS) {
cout << "Error getting device ids: " << errorMessage(error) << endl;
exit(error);
}
// Context
context = clCreateContext(0, 1, &device, NULL, NULL, &error);
if (error != CL_SUCCESS) {
cout << "Error creating context: " << errorMessage(error) << endl;
exit(error);
}
// Command-queue
queue = clCreateCommandQueue(context, device, 0, &error);
if (error != CL_SUCCESS) {
cout << "Error creating command queue: " << errorMessage(error) << endl;
exit(error);
}
分配内存
主机的基本环境已经配置好了,为了可以执行我们的写的小kernel,我们需要分配3个向量的内存空间,然后至少初始化它们其中的两个。
在主机环境下执行这些操作,我们需要像下面的代码这样去做:
const int size = 1234567
float* src_a_h = new float[size];
float* src_b_h = new float[size];
float* res_h = new float[size];
// Initialize both vectors
for (int i = 0; i < size; i++) {
src_a_h = src_b_h = (float) i;
}
在设备上分配内存,我们需要使用cl_mem类型,像下面这样:
// Returns the cl_mem object referencing the memory allocated on the device
cl_mem clCreateBuffer (cl_context context, // The context where the memory will be allocated
cl_mem_flags flags,
size_t size, // The size in bytes
void *host_ptr,
cl_int *errcode_ret)
flags是逐位的,选项如下:
CL_MEM_READ_WRITE
CL_MEM_WRITE_ONLY
CL_MEM_READ_ONLY
CL_MEM_USE_HOST_PTR
CL_MEM_ALLOC_HOST_PTR
CL_MEM_COPY_HOST_PTR – 从 host_ptr处拷贝数据
我们通过下面的代码使用这个函数:
const int mem_size = sizeof(float)*size;
// Allocates a buffer of size mem_size and copies mem_size bytes from src_a_h
cl_mem src_a_d = clCreateBuffer(context, CL_MEM_READ_ONLY | CL_MEM_COPY_HOST_PTR, mem_size, src_a_h, &error);
cl_mem src_b_d = clCreateBuffer(context, CL_MEM_READ_ONLY | CL_MEM_COPY_HOST_PTR, mem_size, src_b_h, &error);
cl_mem res_d = clCreateBuffer(context, CL_MEM_WRITE_ONLY, mem_size, NULL, &error);
程序和kernel
到现在为止,你可能会问自己一些问题,比如:我们怎么调用kernel?编译器怎么知道如何将代码放到设备上?我们怎么编译kernel?
下面是我们在对比OpenCL程序和OpenCL kernel时的一些容易混乱的概念:
Kernel:你应该已经知道了,像在上文中描述的一样,kernel本质上是一个我们可以从主机上调用的,运行在设备上的函数。你或许不知道kernel是在运行的时候编译的!更一般的讲,所有运行在设备上的代码,包括kernel和kernel调用的其他的函数,都是在运行的时候编译的。这涉及到下一个概念,Program。
Program:OpenCL Program由kernel函数、其他函数和声明组成。它通过cl_program表示。当创建一个program时,你必须指定它是由哪些文件组成的,然后编译它。
你需要用到下面的函数来建立一个Program:
// Returns the OpenCL program
cl_program clCreateProgramWithSource (cl_context context,
cl_uint count, // number of files
const char **strings, // array of strings, each one is a file
const size_t *lengths, // array specifying the file lengths
cl_int *errcode_ret) // error code to be returned
当我们创建了Program我们可以用下面的函数执行编译操作:
cl_int clBuildProgram (cl_program program,
cl_uint num_devices,
const cl_device_id *device_list,
const char *options, // Compiler options, see the specifications for more details
void (*pfn_notify)(cl_program, void *user_data),
void *user_data)
查看编译log,必须使用下面的函数:
cl_int clGetProgramBuildInfo (cl_program program,
cl_device_id device,
cl_program_build_info param_name, // The parameter we want to know
size_t param_value_size,
void *param_value, // The answer
size_t *param_value_size_ret)
最后,我们需要“提取”program的入口点。使用cl_kernel:
cl_kernel clCreateKernel (cl_program program, // The program where the kernel is
const char *kernel_name, // The name of the kernel, i.e. the name of the kernel function as it's declared in the code
cl_int *errcode_ret)
注意我们可以创建多个OpenCL program,每个program可以拥有多个kernel。
以下是这一章节的代码:
// Creates the program
// Uses NVIDIA helper functions to get the code string and it's size (in bytes)
size_t src_size = 0;
const char* path = shrFindFilePath("vector_add_gpu.cl", NULL);
const char* source = oclLoadProgSource(path, "", &src_size);
cl_program program = clCreateProgramWithSource(context, 1, &source, &src_size, &error);
assert(error == CL_SUCCESS);
// Builds the program
error = clBuildProgram(program, 1, &device, NULL, NULL, NULL);
assert(error == CL_SUCCESS);
// Shows the log
char* build_log;
size_t log_size;
// First call to know the proper size
clGetProgramBuildInfo(program, device, CL_PROGRAM_BUILD_LOG, 0, NULL, &log_size);
build_log = new char[log_size+1];
// Second call to get the log
clGetProgramBuildInfo(program, device, CL_PROGRAM_BUILD_LOG, log_size, build_log, NULL);
build_log[log_size] = '\0';
cout << build_log << endl;
delete[] build_log;
// Extracting the kernel
cl_kernel vector_add_kernel = clCreateKernel(program, "vector_add_gpu", &error);
assert(error == CL_SUCCESS);
运行kernel
一旦我们的kernel建立好,我们就可以运行它。
首先,我们必须设置kernel的参数:
cl_int clSetKernelArg (cl_kernel kernel, // Which kernel
cl_uint arg_index, // Which argument
size_t arg_size, // Size of the next argument (not of the value pointed by it!)
const void *arg_value) // Value
每个参数都需要调用一次这个函数。
当所有参数设置完毕,我们就可以调用这个kernel:
cl_int clEnqueueNDRangeKernel (cl_command_queue command_queue,
cl_kernel kernel,
cl_uint work_dim, // Choose if we are using 1D, 2D or 3D work-items and work-groups
const size_t *global_work_offset,
const size_t *global_work_size, // The total number of work-items (must have work_dim dimensions)
const size_t *local_work_size, // The number of work-items per work-group (must have work_dim dimensions)
cl_uint num_events_in_wait_list,
const cl_event *event_wait_list,
cl_event *event)
下面是这一章节的代码:
// Enqueuing parameters
// Note that we inform the size of the cl_mem object, not the size of the memory pointed by it
error = clSetKernelArg(vector_add_k, 0, sizeof(cl_mem), &src_a_d);
error |= clSetKernelArg(vector_add_k, 1, sizeof(cl_mem), &src_b_d);
error |= clSetKernelArg(vector_add_k, 2, sizeof(cl_mem), &res_d);
error |= clSetKernelArg(vector_add_k, 3, sizeof(size_t), &size);
assert(error == CL_SUCCESS);
// Launching kernel
const size_t local_ws = 512; // Number of work-items per work-group
// shrRoundUp returns the smallest multiple of local_ws bigger than size
const size_t global_ws = shrRoundUp(local_ws, size); // Total number of work-items
error = clEnqueueNDRangeKernel(queue, vector_add_k, 1, NULL, &global_ws, &local_ws, 0, NULL, NULL);
assert(error == CL_SUCCESS);
读取结果
读取结果非常简单。与之前讲到的写入内存(设备内存)的操作相似,现在我们需要存入队列一个读取缓冲区的操作:
cl_int clEnqueueReadBuffer (cl_command_queue command_queue,
cl_mem buffer, // from which buffer
cl_bool blocking_read, // whether is a blocking or non-blocking read
size_t offset, // offset from the beginning
size_t cb, // size to be read (in bytes)
void *ptr, // pointer to the host memory
cl_uint num_events_in_wait_list,
const cl_event *event_wait_list,
cl_event *event)
使用方法如下:
// Reading back
float* check = new float[size];
clEnqueueReadBuffer(queue, res_d, CL_TRUE, 0, mem_size, check, 0, NULL, NULL);
清理
作为一名牛X的程序员我们肯定要考虑如何清理内存!
你需要知道最基本东西:使用clCreate申请的(缓冲区、kernel、队列)必须使用clRelease释放。
代码如下:
// Cleaning up
delete[] src_a_h;
delete[] src_b_h;
delete[] res_h;
delete[] check;
clReleaseKernel(vector_add_k);
clReleaseCommandQueue(queue);
clReleaseContext(context);
clReleaseMemObject(src_a_d);
clReleaseMemObject(src_b_d);
clReleaseMemObject(res_d);
这是文章的全部内容了,码农们,作者最后说,如果你有任何问题,都可以马上联系他。